embellishment.Stamp pads for inking edges with sponge.... ok so now ill get some piccyss up of making it so you can follow along
INGREDIENTS...
Card base of your colour choice
For chest of drawers you need
two x 9cmx2.5 cm in matching
card stock.
Kitchen bench top and wardrobe fronts in alternative
colours, doors on kitchen cupboard are the same colour the matting under the
doors needs to be a plain colour so as to see the stamped image, in the kitchen
dresser one I used a birthday cake surprise stamp set on the shelf but you can
use anything suitable.
For the kitchen bench you only use two drawers from the
bottom up, same with wardrobe, however with the wardrobe an alternative colour
was used on the inside under the wardrobe drawers.
Baby card using baby bundle stamps set by su, stamped in
white and white heat embossed and a bit of tiny cutting out lol
. And baby tees from the stamping wheel by su for the body
suit white stamped and embossed.
Alternative baby or little stamps can be used for baby
drawer set.
Stampin up has a few punches that will work here but on
these I used the Curly label punch to form bottom, look at the punches you have on hand that
would make a good base, even a plain square double punched will do the trick.
Su Boho blossom punch
for little flowers, alternative can be used
Brads
Vellum
Cuttlebug embossing folder of choice
 Ruler and pencil
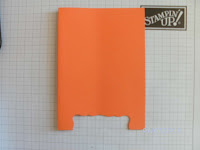
align the bottom of the card with the punch to make the bottom stand, if you have the curly label punch use it to the half way mark again leaving edges around it on either side.
. However the basic design could suit any sort of theme,
toys, shapes, dig out all the little stamps you have!
with a bit of
imagination and playing with the punches you have all can be adapted to your
own stock on hand, or otherwise make a template off the original card and do
the good old hobby knife and pencil way...the only way for me a while ago as i
didn’t have all the punches, really at the bottom you could use a plain square
or even a half circle double punched. Remember to keep room and leave a
border... yes i did one and forgot lol.
Cut a mat of card stock 11cmx9cm in the lightest colour you
have chosen, i chose a crème card stock with tangerine tango card stock and ink., but the
combinations are endless. Sponge edges. I stamped a background using a flourish
stamp from a few years ago in the ink i had done all the edges with.
Sponge front edges and the two strips for the drawers. drawers are 9cm
by 2.5 cm
Attach boho blossom flowers as handles or alternative to the
drawers with brads. attach drawers with dimensional s (foam dots)
Attach to the crème card from the bottom 1cm up with a half cm gap
between the drawers
BELOW DRAWERS BEFORE ADDING THE BOHO BLOSSOM AND BRAD AS DOOR HANDLES
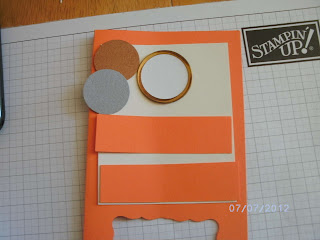
so far you will have this layout su don't sell the metal tags like this anymore sadly but you can just use a circle punch and layer it
 On
that piece of card stock attach the drawers to the bottom; it will leave a
large area up the top which is what we want that’s why the background stamp is
good as it can look a little plain. Drawers were attached from the very bottom
then half a cm above it using 3 dimensional/foam squares in this one. I then
stamped my quote above the top drawer in a dark colour. Above this in the
centre(using your ruler as a guide) attach the metal circle... if it was bigger you could cut out a piece of silver
reflective paper and make it look as if it was a mirror, just a suggestion!!!!!
On
that piece of card stock attach the drawers to the bottom; it will leave a
large area up the top which is what we want that’s why the background stamp is
good as it can look a little plain. Drawers were attached from the very bottom
then half a cm above it using 3 dimensional/foam squares in this one. I then
stamped my quote above the top drawer in a dark colour. Above this in the
centre(using your ruler as a guide) attach the metal circle... if it was bigger you could cut out a piece of silver
reflective paper and make it look as if it was a mirror, just a suggestion!!!!!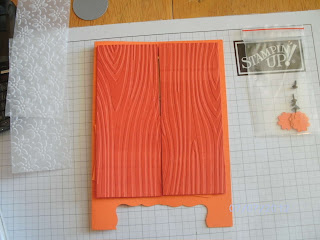
 Cut out two pieces of vellum 4.5cm by 11cm, emboss with cuttlebug and attach with the thin ds tape to the doors. Attach brads, or door handles in this case i used a few little metal tag things from old craft stuff i had to make the door handle, a pearl or plain brad will work just as well.
OK so here is the harder part the doors.
Cut out two pieces of the door card to 12 cmx5 ½ cm.
Score
the doors on opposite sides 1cm in fold as this section will be attached behind
the large matting with the drawers. Now this was an exact fit so check its
right , before you attach score it and lay it out to make sure the doors close
and touch. Punch an edge on a one cm strip apr0x 9cm long to be cut in half,
sponge all edges in a cream or white
edging sit aside to dry as it sits at the top of the wardrobe doors emboss doors if desired.
Measure 2 cm from the bottom and the same for the top and
mark out (centralize where you need the windows to be punched with the 1 and ¾
inch square punch, or use hobby knife. To cut out the window.
Tape decorative strip to the top part of the doors and any
other little embellishments you desire .e.g. on mine I added some sticky lace
on the window edges
Attach the doors once completed to either side of the mat
base with the drawers etc already in place.
Use
extra strong sticky tape and then attach the section to the front of the card.
Matting needs to be added inside the card on the back page as it is front
heavy, maybe even two tones if you think it will need it to even the weight
distribution. OK well that’s about it hope it’s easy to understand,
TOMORROW WE WILL DO THE KITCHEN DRESSER AND THEN THE BABY CHEST OF DRAWERS, AND QUESTIONS PLEASEDONT HESITATE TO CONTACT ME,,, HAPPY CRAFTING XXXX


 you can get them plain like this green one
 or pre embossed , legs will be punched in both kits. kits are 5.50 plain, or 6.50 embossed. instructions also come printed with the set, these sets can be tailor made for you contact me at kerriemccallum@yahoo.com if you would like to obtain a kit.Each kit will have everything spoken about in these
instructions, you will only need ink, a background flourish stamp etc or
similar, foam squares , ds sticky tape and extra strong ds tape, ruler pencil,
and getting down and inky with it lol hope you enjoy your kits!!!
or pre embossed , legs will be punched in both kits. kits are 5.50 plain, or 6.50 embossed. instructions also come printed with the set, these sets can be tailor made for you contact me at kerriemccallum@yahoo.com if you would like to obtain a kit.Each kit will have everything spoken about in these
instructions, you will only need ink, a background flourish stamp etc or
similar, foam squares , ds sticky tape and extra strong ds tape, ruler pencil,
and getting down and inky with it lol hope you enjoy your kits!!!
 Ruler and pencil


 On
that piece of card stock attach the drawers to the bottom; it will leave a
large area up the top which is what we want that’s why the background stamp is
good as it can look a little plain. Drawers were attached from the very bottom
then half a cm above it using 3 dimensional/foam squares in this one. I then
stamped my quote above the top drawer in a dark colour. Above this in the
centre(using your ruler as a guide) attach the metal circle... if it was bigger you could cut out a piece of silver
reflective paper and make it look as if it was a mirror, just a suggestion!!!!!
On
that piece of card stock attach the drawers to the bottom; it will leave a
large area up the top which is what we want that’s why the background stamp is
good as it can look a little plain. Drawers were attached from the very bottom
then half a cm above it using 3 dimensional/foam squares in this one. I then
stamped my quote above the top drawer in a dark colour. Above this in the
centre(using your ruler as a guide) attach the metal circle... if it was bigger you could cut out a piece of silver
reflective paper and make it look as if it was a mirror, just a suggestion!!!!!
 Cut out two pieces of vellum 4.5cm by 11cm, emboss with cuttlebug and attach with the thin ds tape to the doors. Attach brads, or door handles in this case i used a few little metal tag things from old craft stuff i had to make the door handle, a pearl or plain brad will work just as well.

