WELCOME BACK TO THE NEW IMPROVED CREATE CORNER. 2013

So without further adu lets get creating with the above card another from a previous furniture series i have posted up here in archives or on Facebook I cant remember lol. sorry its been a while.this was a fun card to get back into it, as I have said on Facebook its not an original, well it is , I got the idea from pintrest and made a few changes to make it mine, if that makes sense at all lol. ok ive tried to help you along with photos so lets go.................................
YOU WILL NEED;
big shot/cuttlebug
stamping up framelits for mirror dies
modern label punch.
base card (creme)
two scrapbook paper pieces 3 and 3/4 inches x 3 and 3/4 inches and enogh to make mirror backgrond in framelits of 3 sizes creme brown then the bottom colour in this case the yellow floral.
4 inches x 3/4 inch x 2 pieces of brown card stock (close to cocoa) to make up the skirting board and to cover the join where the two papers meet.
1/4 inch strip x 2 one 3 and 3/4 long the other approx 4 inches place on and cut off excess.
stamps for floral section on drawers from Easter blossoms set and words from loving thoughts stamp set both from stamping up.
glitter rhinestones for drawer handles and mirror tops and bottoms
OK LETS GO
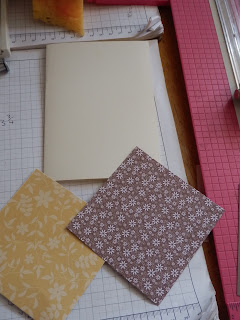 Choose your designer paper you want to use as a wallpaper feature wall. you need 2 pieces the top one being the more dominant size over the yellow paper. make sure both pieces line up evenly before you stick them down.onto your base card. (mine being the creme card above.)
 using double sided tape on the back stick down the yellow section first then the brown section over it from the top down
 once stuck down get the brown card stock and ink up the edges with the brown (close to cocoa) and attach skirting board and the wooden strip that covers where the two papers join. on the middle board I added a thin 3/4 inch sponged strip to give it a more .'feature wall' appearance
 |
| sponge with ink |
 |
the base card with wall finished
NOW WE CONTINUE ON WITH THE CHEST OF DRAWERS
|
using the colour you want your chest to be in i chose creme and close to cocoa, sadly discontinued . measurement are 2 -3/4 x 3 - 1/4 inches. sponge edges of chest in close to cocoa or your preferred colour.
now using your modern label punch available from stampin up through me or your current hostess, and punch out three of the shapes then stamp and sponge edges in matching ink. I used the small flower from Easter blooms set, it worked in well but the choice is yours!!!!
now you need to attach the two struts and chest edging from top of chest to make it appear the mirror(framelits)are attached.
these are as shown 3 and 3/4 inches x 2 inches, but i think in my next one i would make them only an inch thick as they seemed too heavy to me, but its your choice, sponge and attach at back of chest evenly.
ok so once that's done begin to apply the drawers using dimensional s foam dots, making sure drawers are evenly spaced. attach pearls/rhinestone shiny s for handles on the drawers and on the mirror to tie it in. I have also attached a thin 1/4 strip as the top of the chest of drawers all must be sponged first. this was approx 4 inches but I trimmed edges down to look in proportion.
now using your framelits or similar from stampin up or nest-abilities and cut three stages the centre needs to be a light colour if your going to stamp in it however you can use that reflective card stock, but I don't have any , al-foil would look ok too!!!
the third stage I used an off cut from the yellow scrapbook paper just to tie it all in, the bling went on the close to cocoa card stock. all edges were sponged and stuck together with double sided tape. the centre stamp was from the set loving thoughts from stampin up. so attach the three layers to the top of the card making sure it just hits the top if the card base
 and here it is. hope you enjoy it feel free to ask if you don't understand something , have a create corner day xxxxxxx till next time. kerrie xxx


